Hunting Pictures: Keep it Simple, but Watch Some Little Details
Tell the Whole Story, Not Just "The End"
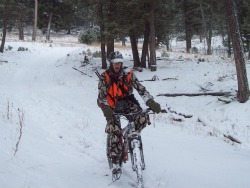
Remember to take hunting pictures of the whole hunt, even the drive, hike or bike in, not just the dead animal that hopefully results.
Recent Articles
-
Elk Nut (Paul Medel) Elk Communication Products Now Available
 “Elk Nut”, Paul Medel, has studied elk sounds for over 30 years. His products will help you have more “close encounters of the herd kind”. Available with free shipping on this site.
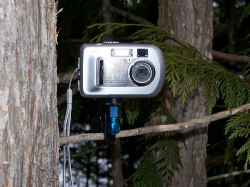
When a tripod is too inconvenient to carry. Check out the Clip-Shot Camera Mount. It weighs one ounce and holds up to about 20 ounces. It mounts to tree branches, an arrow or stick stuck in the ground, anything you can clamp it to! No one gets left out of the picture, even if you are alone. Use the self timer to take hunting pictures of yourself with your downed trophy or some video of the hunt.
Unless taking a still shot of the hunter and quarry, don’t just take posed shots of hunters. Catch them doing things that pertain to the hunt, rather than smiling for the camera. The best hunting pictures are often taken with no time to "get ready".
Scenery Shots
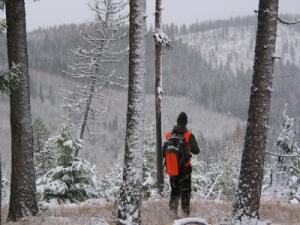
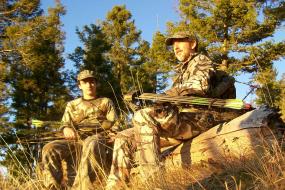
If you want a subject in a scenery shot, don’t be afraid to put some distance between you, so that they become part of the scenery. A dark figure of a hunter in the foreground that is highlighted by the background of an expansive mountain range at dawn or dusk, for instance, might make a dramatic statement about elk country and your hunt.

An action shot (not posed) of a hunter somewhat “overwhelmed” by mountainous scenery can produce a vivid story teller! “We started here, but ended up killing an elk way up there.” Of course, this requires forethought and snapping of photos as you walk and hunt.
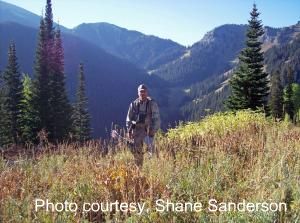
The next photo still allows the viewer to identify the subject, but the photographer is far enough away that the mountain scenery become a second subject that adds greatly to the "story" of the photo. (Click for larger image.) By the way, the "rule of thirds" is nicely followed in this photo. (See Rule of Thirds discussion below.)
Keep Your Camera Handy
Carry your camera in a way that you are most likely to use it. I carried mine in my pack for a couple of years and rarely touched it, unless I killed an animal. When I started carrying it in a pouch on my belt, I began taking hunting pictures that I could share on this website and with family in a way that tells an interesting story, rather than just “The End”.
A picture of an elk on the ground, to a non-hunter, may make it look like an easy event to accomplish. Take hunting pictures to tell the real story of the effort and skill that lead to it.
Get the Light Right
Avoid harsh lighting situations, if possible. Bright sunlight will wash out colors and details in the photo, as it did on the photo to the right. (click to see larger photo.) If bright sunlight is unavoidable, try different settings on your camera and check the results on your LCD monitor to see which ones look the best. Take some more on that setting until you get something you really like. The immediate feedback of the LCD is very helpful in getting a good shot. With digital cameras, you have the opportunity to keep shooting because you can delete what you don’t like without developing.
In bright light turn the flash on to “fill” any shadows and see how that looks on the monitor. If there is a “fill flash” setting, use that in bright light to get rid of shadows without washing out the details further. Most cameras also have a “white setting” to allow you to match the lighting in snow, sun, clouds, etc.
Try to put the sun behind the camera, but avoid casting an unwanted shadow onto the photo field. The best lighting for nice looking photos is in the very early morning and early evening. Softer light may also be available under the trees, but watch out for streaks of sunlight cast across the subjects. Bright light on parts of the subjects next to dark shadows makes for a less than appealing visual effect.
Get to Know Your Camera
Nikon D40 Digital SLR Camera. Buy.com Price: $446.95
Play around with your camera and owner’s manual in advance. In the field you may be rushed to pursue your quarry or anxious to get to work field dressing and retrieving downed game. Know how to change settings and try to have a basic understanding of what the settings are for.
You can usually set the resolution on a digital camera for sharpness of the picture. You’ll get better quality on the highest setting, but it will also make it harder to send by email, due to the size of the file it creates. Your recipient may not appreciate having to spend the time to download a huge photo.
If you have a high quality photo that you want to send electronically in a smaller file version go to http://quickthumbnail.com/ to reduce it to whatever size you want. We use QuickThumbnail.com to reduce photos to an appropriate size for this website, so you don’t have to wait too long to open web pages with photos.
Pictures of Downed Game
Kodak Easyshare C913 9.2MP Digital Camera + 2GB Accessory Outfit Price: $98.54
We have a forum on this site for elk hunting photos and stories - photos will not have to follow these guidelines.
If your hunting pictures are going to be of animals you have killed, avoid sitting on the animal in a triumphant pose. Show some class, as well as some respect for the animal that gave its life for you. I have taken a couple of those embarrassing pictures, but they look very unprofessional.
Take pictures before gutting or get up close to avoid the bloody field dressed area of the animal. Hanging animals aren’t attractive, even to the one who did the shooting. Take photos that show respect both for the animals and those looking at the pictures.
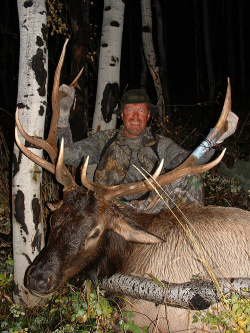
Position the hunter on the opposite side of the animal from the camera, so that his or her head is positioned just above the animal’s head. Also, having the hunter on his knees looks better than having his knees sticking out in front of him.
Get the camera down at slightly above eye level with your animal, as you hold its head up. Downward angles deemphasize your trophy.
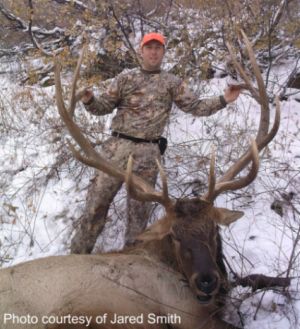
This photograph of a downed six point bull is set up to enhance the size bull's antlers. Standing back from the antlers and holding the highest (farthest back) antler tips tends to "monsterize" an already nice trophy!
You might give this a try, if the terrain is right, but also set up some kneeling shots.
Try different shots with different settings, including shutter speed and flash or no flash. Try different angles. Take a lot, keep only those worth keeping. Delete the junk.
Watch the Hat, Remove the Orange
People wearing hats often end up with darkened faces in hunting pictures. If the person doesn’t want to show their “hat head” for the picture, try to maneuver the light angle to minimize the shadow. Try the flash to fill in the shadow.
While it’s best to leave hunting clothing on in hunting pictures, bright blaze orange is best removed, since it is so bright and attracts the eye so strongly. Sometimes it plays havoc with the light sensor on automatic cameras.
Set it Up and Get Close
If possible, move your animal around until you get the best background that you can. Study the background around your subjects. Less “busyness” behind them is better. Dramatic or sharp, distracting backgrounds will take away from the close up image you are trying to preserve. Tree branches in the background might make it hard to see antlers.
When taking hunting pictures of subjects posing with a killed animal, don’t be afraid to get up close. Fill the frame with the subjects. The photo might even turn out better with only the front end of an animal in the picture, rather than the whole body. It’s true that you can always crop it on the computer or right on the camera, but you will lose some quality when you enlarge that result, another reason to go ahead and shoot at the highest setting.
In most cases, it’s best to have the animal’s side toward camera, rather than head on. Also, having the head turned to the side slightly will accentuate the antlers. Look around your subjects for unwanted distractions.
Move things or the camera angle around to eliminate equipment on the ground, blood, mud in the snow, etc. from the frame. If needed, cover up blood on the ground with some dirt, grass or other plants.
If you want your rifle or bow in the hunting pictures, don’t let it become too prominent and take away from the two most important subjects, the hunter and the animal. Resting the gun or bow across the antlers looks amateurish. It looks much better laying across your trophy’s side. Make sure the gun is pointing away from the camera or the hunter to avoid embarrassing looking safety infractions in your photo.
Sometimes Terrain Makes it Difficult
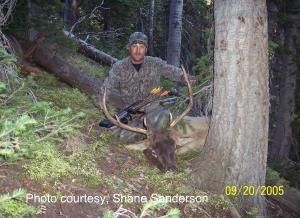
Sometimes the terrain is steep and the ground cover is tough to deal with. Moving an elk is hard enough on flat ground. Do the best you can within the limitations. A closer shot might have improved the next photo. Turning the antlers to the side would emphasize them. Take pictures from all angles and pick the best later.
Do Sweat the Details
Take some time to clean the animal up a little. Tuck in legs and hooves as it would when bedded down. Shove the animal’s tongue back in its mouth. If the tongue is unmanageable, cut it off. If your animal has blood dripping from the nose or mouth, consider putting a small amount of toilet paper in there out of sight to stop the flow while you take the picture.
Take the photo of the side of the animal where the wound shows least, or not at all. The exit hole will always be the biggest. If the hide has a bloody spot on it, try rubbing a little dirt on it and then brushing it off. The dirt will soak up some of the blood and provide a little scrubbing action. Rubbing snow on the spot will help a lot, too.
The hunter should use one hand to hold up the animal’s head. Try pointing it a little to the left or right of the camera, as if looking off in the distance. Try to position the antlers to get the best affect.
Minimize hand contact while holding the head up in order to get the best antler effect for your photo. See if you can hold the head up from the opposite side of the neck or jaw. Sometimes you might be able to use an inconspicuously placed forked stick behind the animal’s neck or head to help the hunter hold up the weight for several pictures.
The "Rule of Thirds"
Try not to center subjects in your hunting pictures. Also, try not to cut the picture in half with any straight line, like a tree trunk or horizon. If you want to learn more about “the rule of thirds”, click here. Otherwise, put simply, a picture is more attractive if the subject(s) is not centered in the frame.
If possible, some sky behind the upper half of the subjects helps to showcase the most important parts of your photo (faces, heads and antlers). If the angle won’t work out for that, try a more solid background that your subjects won’t blend into. Snow works just as well as sky. Depending on the lighting, a flash might pull the subjects right out of the background, but it might also be too glaring.
Watch for “red eye” from the flash. Usually a different angle will prevent red eye in hunting pictures when a flash is needed. The “red eye” setting will only work on human subjects, not on a dead animal. The extra, early flash will cause the person’s pupil to close before the second flash, but it could still reflect off the retina of the animal.
Try turning your camera vertically to set the photo up for use in a frame. Try different things and you’ll have more options when you get home.
Keep it Natural
If you don’t get in-the-field hunting pictures, consider taking photos on the ground somewhere else, rather than in the pick-up or some other unnatural looking setting, like hanging in the garage next to the lawn mower.
You only get one chance at a time preserving your hunt with photos. The opportunity quickly evaporates and never returns. Put some thought and effort into your hunting pictures and you will have preserved opportunities to share and relive those rich memories of your elk hunts for the rest of your life, and probably beyond!
(Do you have any additional recommendations about hunting pictures?
Please subscribe to or our Quick Elk Hunting Tips and Updatesnewsletter or to an RSS feed (see left column for both) to be alerted whenever new information is added to the site.
We'd appreciate it if you would "Like" us on Facebook, or share this site with others.
Search this site here:


Comments:
Hector, TX: "Wow, that was fast! It's very pleasant to see your sincere spirit of service and customer care... You are doing way more than selling products to customers like me...we are getting tremendous value from all you do with your site and your business."
Tim, AZ: "This morning, she was 145# on the hook. I definitely owe some of my success to your website and your products. Thanks again!"
Jesse, NM: "I just wanted to thank you for taking the time and energy
in creating such an amazing and helpful website. As a new hunter, this provides
an excellent guide to approaching elk hunting. I just wanted to thank you for
sharing such a wealth of knowledge, and giving us new hunters a fighting chance
of filling a tag. You guys are amazing!!!"
Skip, (Tucson, AZ) "Your Elk Hunting Tips Web Site is the best, most helpful
one I have ever seen. I read and profit more than I can tell you. I just wanted
to tell you THANKS!
P. Scott, (BC 2016) "I would like to thank my hunting partner for the great company & this website for the wealth of information that I have gleaned & also the gear bought as every bit of info etc. is required to harvest one of these regal animals."
Thomas (OR), "Reading your tips has helped me to formulate a hopefully
positive and safe game plan for the 2014 elk season!"
Travis (WI), "I just wanted to say thank you for your site, and helpful emails! I got several useful tips from you, and your site. ...got to put the smack down on my first elk, a beautiful New Mexico 300 class bull."
Tristan, Superior, CO: "I feel like I could go on forever here, I just get so excited talking about elk and I don't know many other hunters… Thanks again for the gear, and the website. I have found it to be very useful and enlightening.
Jordan, MT: "Your website is a great help! I wanted to personally thank you for the great tips on hunting elk. I am extremely excited for this elk rifle season as its my first. I wish you luck during your hunts and God bless!"
Shop Our Store

Newsletter Opt-in:
"I just get so excited talking about elk.." ~Tristan, CO
Search This Site Here:
Hunting Gear Reviews
ASAT CamoElkNut Outdoor Prod.
Bugling Bull Game Calls
HECS Stealthscreen
Montana Decoy
StringSling Bow Sling
Skull Hookers
Safari Sling Rifle Sling
Clip-Shot Mini Camera Mount
ASAT Camo
Bugling Bull
Game Calls
ElkNut Productions
Free Shipping on
ElkNut Products Here
HECS Stealthscreen:
A New Type of Concealment!

$199.99,
Including U.S. Shipping
Montana Decoy Elk/Deer
Available Here!

The StringSling:
Best Bow Sling Design!

$29.95, Including U.S. Shipping
Clip-Shot: 1 oz. Camera Mount
Skull Hookers

$34.99 & 59.99 Free U.S. Shipping!
The Safari Sling:
Best Rifle Sling Design!

Share your elk hunting pictures and stories on our
Facebook Page!
Forum Topic Discussions:
How often should I use my cow call?, I am new to the sport of bow hunting elk and my question is how often should I use my cow calls?
295 yard kill with a Kimber Montana 325 WSM, by Don from Dallas: My ELk did not even twitch once. He was dead when he hit the ground.
325 WSM is worth considering, Palmer Lake,CO: I believe that the .325 WSM is the ultimate elk caliber...
30-30 for Elk? : I have a 30 30 with 170 grain round nose bullet. Will this work to shoot an elk ?
(More comments about Best Elk Rifle below)
Submissions
Unique Elk Talk by Idaho Steve (Hailey, Id ), In the middle of the night, a herd of elk came traveling through the drainage and right past my tent...
Smelly Elk Areas? by Jimmy (New Mexico), I've come across many areas that just stink of elk, literally. I have heard two somewhat contradictory stories...
DIY Gear List Must Have's! by Craig (Florida) "Here are some of the items I use on my DIY hunts in the CO backcountry..."
Elk and Deer Hunting and Mountain Bikes, by Skip Shepherd (Tucson, AZ)~ At 67 I am thinking a lot about investing in a mountain bike to get back into remote areas...
Solo archery hunting -- tips for calling/set up?, by Idaho Steve (Hailey, ID )~ I hunt by myself a lot...I'd love to hear your thoughts on strategic set-ups when solo hunting and calling.
Non- Lead Bullets for Elk?, by Dave, Elk Hunting Tips.Net (Garrison, MT)~ What do you ballistics guys think about the use of non-lead bullets for elk? According to this story...
Rage Broadheads by Chris, ...my buddy gave me a rage practice tip and when I shot it you could not pick out the broadhead from the field points. I was sold...
Recent Submissions:
Finally filled the freezer..., Colorado Rockies~ "I was bummed when I got to the property and no elk, nor any hoof prints in the snow. ...I pulled each of the elk into shade then started gutting..."
Wounded Veteran Elk hunts, by Joshua FL), I am a disabled veteran of Operation Iraqi Freedom and have always dreamed of hunting elk. I am posting this to see if anyone would know of any elk hunts free to disabled vets....
First Elk with a Bow, by Ryan H. (Colorado), ...Finally after many years of hunting with a bow "I got er did"!
First Elk!, by Tater (Sheridan, Arkansas) I took the advice I received from this website and was successful…I wanted to Thank You and Your Forum and the folks that share on here for the knowledge and information that helped me find an elk I was quite happy with.
Any success in Unit 14?, by: Dave (MI), "I'm planning on doing a DIY in Unit 14 for 2012..."
Bugle in Herd bulls, by Swiltbank (Az) The key to calling in a herd bull is to get into his bedding grounds and threaten his herd. Start off sounding like…
Best Rifle Caliber?, by Buglemup (Superior, MT), "I've been reading what people have been writing about rifle calibers and here is what 16 years of guiding elk has taught me."
7mm Remington Magnum, by Dean (Helena, MT. USA) I use my Liberty Ruger M77, 7mm Rem. Mag. for antelope, deer, elk... Comment: "What do you guys think about the idea of hunting elk with a 270? I also know a guy who kills elk with a 243."
338 Marlin Express, "Light, fast shooting, hard hitting, manageable recoil, and for a lever gun - very accurate."
Guns I like for Elk, by Mountain Walker (Kootenays east B.C. Canada),"I think the gun you shoot Elk with should be one you shoot a lot with... "
.35 Remington, by Bill Smith "...my .35 Rem appears to have dropped a medium deer flawlessly, but I now have serious doubts as to its capability to take an elk."
Where to hunt in Az unit 3B?, by Cliffjumper (Tucson, Az) ~ I got a late bull muzzle loader hunt in Arizona unit 3b. Does anyone know how to hunt bulls in the late season?...
First time elk hunter hunting Arizona unit 6A , by Rob Marchio (Omaha, Ne)~ I'm a first time elk hunter hunting Arizona's unit 6A. I'm planning on staying in the Pine Grove campground...
Help needed for 1st DIY Hunt w/Son, by Patrick (Parker, CO), "I was looking for some advice on my 1st DIY hunt for 2014 in CO with my 13 yr old son. I have countless hrs going over stats, topo maps & Google Earth"
Elk Hunting Colorado in 2013, By William (Midland, TX) "I am planning an elk hunt next year in Colorado and I wanted to know if hunting Gunnison National Forest..."
Unit 60 Elk 4th Rifle Season Nov 13-17 Either Sex 2013, By Chester "...Any general advice about the unit would be appreciated!"
Elk Hunting Idaho Unit 8 8A 11, This is my first year seriously trying to track down some elk. Is there anyone that has hunted in any of these units and can give me some friendly advice? Mitchell, Moscow Idaho
Elk Hunting Pocatello by Cameron (Pocatello) Where is the best place to elk hunt around Pocatello, Idaho? I'm a student at ISU and I'm looking for somewhere around here to hunt next season.
How is the elk hunting in unit 30A in Idaho?, by Terry (Richland Center, WI) Has anyone archery elk hunted in unit 30A in Idaho? What can you tell me about the area?
Hunting in Western Montana, by Mike A. (Alabama)
I did not draw a tag for Missouri breaks where I have hunted in the past. Having to start over and try western Montana.
New Mexico Unit 49, by Silas (Los Alamos, NM)
If anyone has tips on areas to start scouting, I'd really appreciate it.
First Elk Hunt First Elk Hunt, by Big "R" (NM)
I finally got drawn for a late elk hunt in Unit 28, north of Road 506 and south of the boundary line of the Lincoln National Forest...
Cow elk in Nevada's unit 222:
"Any good places known in unit 222?"
Northeast Nevada Early Elk hunt, by John (Carson City,NV)
"Any suggestions on what areas I may see some signs of elk?"
Retired USMC MSgt Needs Advice, by Ken Wing USMCRET (Bealeton, Va)
Popcorn VenisonPopcorn Venison with Maple Syrup?
Elk or Venison Steaks Grilled to Perfection Here's how to turn them into steakhouse steaks!
Spice-Crusted Grilled Venison Roast Recipe This Spice-Crusted, Grilled Venison Roast recipe works great for any red meat roasts, including elk, deer or beef roast...
Corned Elk Recipe You can easily make corned venison and elk, moose or corned beef from these instructions...
New! Comments
Leave a comment in the box below.